Class 7 . Mathematics . Ganita Prakash Part II . Constructions and Tilings
Chapter 6: Constructions and Tilings
Ch 6
Mathematics
Class 7
Geometric Constructions
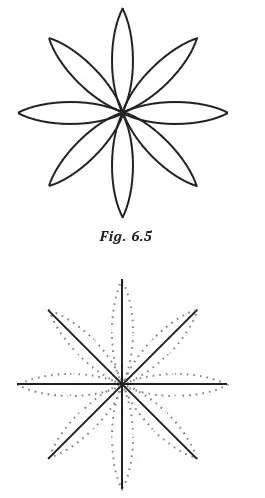
Constructing Symmetrical Eye Shapes
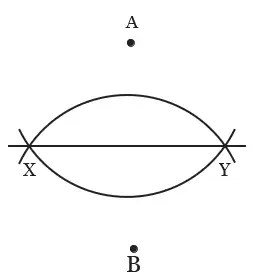
Perpendicular Bisector
Use these conditions to identify the midpoint and the right angle.
Construct the perpendicular bisector of
- Set the compass to a radius greater than half the length of .
- With the same radius, draw arcs centred at and so they intersect above and below at and .
- Draw the straight line through the two arc intersections.
- Mark its intersection with ; the line is the perpendicular bisector.
Since , , and is common, by SSS. This gives . Then by SAS, so and . These equal angles form a straight angle, so each is ; therefore bisects at right angles.
Construct the perpendicular bisector of an cm segment using arcs of radius cm.
- Construct the perpendicular bisector of a segment that is cm long, using arcs of radius cm.
- The radius is greater than half the segment, so the arcs intersect at two points.
- Draw equal-radius arcs from and and label their intersections and .
- Join to ; the construction makes the midpoint and perpendicular to .
Equidistant Points and Different Eye Shapes
If , then lies on the perpendicular bisector of . Let be the midpoint of ; is common, and , so by SSS. The equal adjacent angles at are each , placing on the perpendicular bisector. Conversely, points on that bisector form equal right triangles to and , so their distances from the endpoints are equal.
Two equal-radius arcs from and intersect at and . What can be concluded about line ?
A point satisfies . Where must lie?
- Equal-radius arcs from a segment’s endpoints meet on its perpendicular bisector.
- The line through the two arc intersections bisects the segment at .
- All points equally distant from the segment’s endpoints lie on the same perpendicular bisector.
Quick recap
- An eye shape can be made from upper and lower arcs with centres equally distant from both endpoints of a supporting segment.
- Equal-radius arcs from the segment endpoints intersect at points on its perpendicular bisector.
- Joining the arc intersections produces a line that bisects the segment and meets it at .
- The construction is justified using SSS and SAS triangle congruence.
- A point is equidistant from the endpoints of a segment exactly when it lies on the segment’s perpendicular bisector.
- Different pairs of centres on that bisector create different eye shapes.
Construction Of Perpendicular Bisector
Constructing a Perpendicular Bisector
Perpendicular bisector — A line that passes through the midpoint of a segment and is perpendicular to it.
Any point equally distant from the endpoints of a segment lies on its perpendicular bisector. Conversely, points on the perpendicular bisector are equally distant from the endpoints.
Key construction facts
- Arc intersections: With equal radii from endpoints and , an intersection point is equally distant from and .
- Two points determine a line: The two arc intersections lie on the perpendicular bisector, so joining them gives that line.
- Radius choice: Each radius must be greater than half of so the arcs from and intersect.
- Tools: Use an unmarked ruler and compass; a marked scale is not needed to locate the midpoint.
Use this condition to identify points on the perpendicular bisector.
Compass-and-ruler construction
- Set the compass to a radius greater than half of .
- With the same radius from and , draw intersecting arcs above ; label their intersection .
- Repeat below using equal radii from and ; label the intersection .
- Draw the line through and ; it bisects at a right angle.
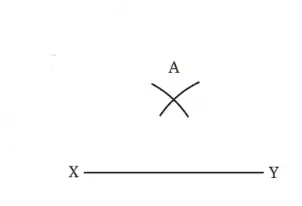
How can the perpendicular bisector of a given segment be constructed using a compass and an unmarked ruler?
- Construct the perpendicular bisector of a given segment by making arc intersections and .
- Join the two arc intersections.
- The line passes through the midpoint of and is perpendicular to the segment.
The radii from and must be equal within each intersecting pair of arcs. The radius used above the segment need not match the radius used below it, as long as both pairs intersect.
Rope Construction
Historical construction method
- Śulba-Sūtras: These Vedic-period geometric texts describe constructions used for ritual fire altars and belong to the six Vedāṅgas.
- Rope as a tool: A rope can mark arcs or circles and, when stretched, make a straight line.
- Kātyāyana-Śulbasūtra 1.2: Describes a rope method for constructing a perpendicular bisector.
Rope method for a perpendicular bisector
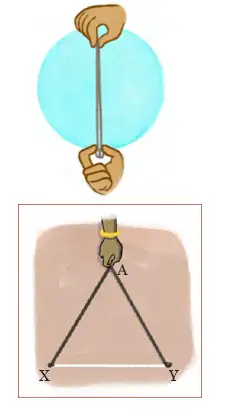
- Place pegs at the endpoints and , and mark the midpoint of a sufficiently long rope.
- Fasten the rope ends to the pegs and pull its marked midpoint taut above ; mark that position .
- Pull the midpoint taut below and mark that position .
- Join and ; both points are equidistant from and , so the line is the perpendicular bisector.
Constructing a 90° Angle at a Point on a Line
Perpendicular at a point — A line through a given point on a line that forms a right angle with the original line.
If is the midpoint of , the perpendicular bisector of passes through and is perpendicular to the given line.
Choose and on the line at equal distances from , then construct the perpendicular bisector through .
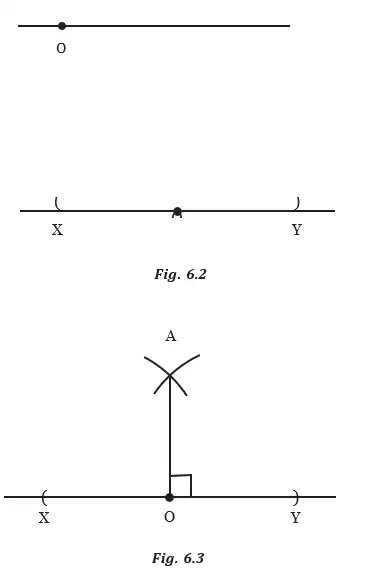
Compass-and-ruler construction at
- Mark points and on opposite sides of so that is their midpoint.
- With a radius greater than half of , draw equal-radius arcs from and to intersect at .
- Join to ; this line is perpendicular to the given line at .
How do you construct a 90° angle at a given point on a line?
- On a given line, choose and equally far from .
- Construct an arc intersection using equal-radius arcs centered at and .
- Join to ; since and are both equidistant from and , is the perpendicular bisector.
Must the arc radius above be the same as the radius below ?
Can both arc intersections used to draw the bisector lie on the same side of ?
Why does the rope construction give a perpendicular bisector?
- Equal distances from and identify points on the perpendicular bisector of .
- For a 90° construction at , make the midpoint of a segment on the given line.
- A ruler and compass, or a taut rope, can construct the perpendicular bisector.
Quick recap
- A perpendicular bisector passes through a segment's midpoint at 90°.
- Points equally distant from the endpoints lie on the perpendicular bisector.
- Equal-radius arcs from both endpoints give points on the bisector.
- Join two distinct arc intersections to construct the full bisector.
- The upper and lower arc pairs may use different radii.
- To construct a perpendicular at , first make the midpoint of a segment on the line.
- The Śulba-Sūtras describe rope-based constructions, including one in Kātyāyana-Śulbasūtra 1.2.
Angle Bisection for a Design
Bisecting an Angle and Making a 45° Angle
If three corresponding sides of two triangles are equal, the triangles are congruent; their corresponding angles are equal.
Use this relation after bisecting an angle.
Construct an Angle Bisector
- Mark points and on the two arms so that .
- Using the same radius from and , draw arcs that meet at .
- Draw ray ; it bisects by SSS congruence.
How can you construct a angle using a ruler and compass?
- Construct a angle and mark equal distances from its vertex on both arms.
- Draw equal-radius arcs from the marked points to meet at , then draw .
- The bisector divides the angle into two equal parts.
An angle measures . What are the angles formed by its bisector?
If equal-radius arcs from and meet on the other side of , does joining their intersection to still bisect ? Why?
Repeating Units and Copying an Angle
Repeating a Design Unit
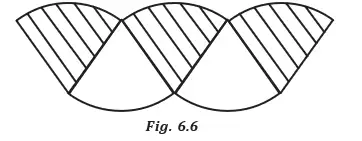
- Exact copies: A repeating pattern is made by repeating one unit, sometimes in different orientations.
- Matching units: Each copy must have the same arm lengths and the same angle between its arms.
- Compass use: A compass transfers equal lengths; angle copying ensures the arms meet at equal angles.
Copying an Angle — Constructing an angle equal to a given angle at a new vertex, using a ruler and compass.
Copy an Angle
- From the original vertex , draw an arc that cuts the angle arms at and .
- At the new vertex , draw an arc with the same radius, cutting the given starting ray at .
- Set the compass to chord ; from , mark point on the new arc so that .
- Draw ray . Since the arc radii match and , the triangles are congruent by SSS, so the copied angle equals the original.
The original and copied triangles have equal corresponding radii and equal chords, so they are congruent by SSS. Therefore, their angles at the vertices are equal.
How can you copy a given angle at a new vertex?
- Suppose the original angle is . Draw an arc from its vertex to mark the two intersection points.
- At the new vertex, draw an arc of the same radius; transfer the chord between the original intersections onto this arc.
- SSS congruence makes the angle at the new vertex equal to the original angle.
When copying an angle, transferring only the arc radius is not enough: also transfer the chord between the original arc intersections to the new arc.
Application
- Parallel lines: Copying an angle provides an important ruler-and-compass method for constructing parallel lines.
Quick recap
- A full turn divided into eight equal angles gives each.
- Mark equal distances on the arms and draw matching arcs to construct an angle bisector.
- Bisecting a constructed angle gives .
- To copy an angle, transfer both the arc radius and the chord between its intersections.
- SSS congruence proves that the copied angle equals the original.
- Repeated design units need equal arm lengths and equal angles; angle copying can help construct parallel lines.
Construction of a Line Parallel to Given Line
Constructing a Parallel Line with a Ruler and Compass
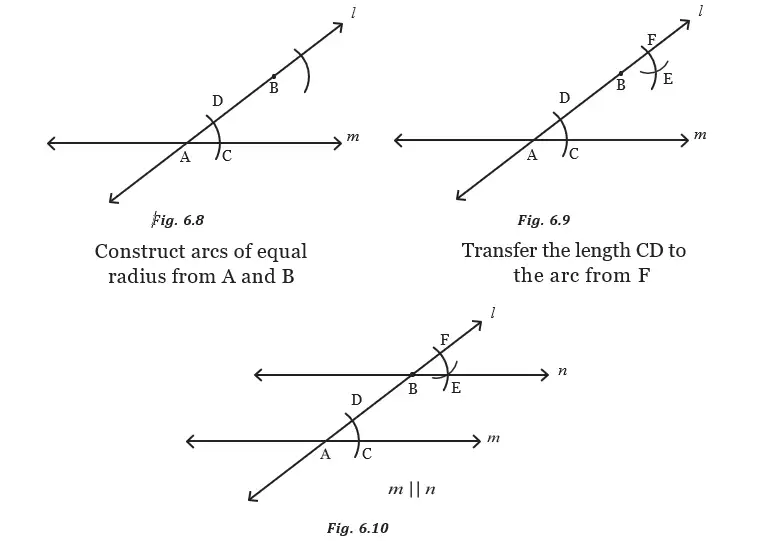
Copy an Angle to Construct a Parallel
- Draw a transversal through the given line m, meeting it at A; mark the required point B on the transversal.
- With centre A, draw an arc cutting the two arms of the angle at P and Q.
- With the same compass radius, draw an arc centred at B; it cuts the transversal at R.
- Set the compass to the distance PQ and mark S on the arc centred at B, on the side needed for the parallel.
- Draw BS. The copied corresponding angle makes BS parallel to m.
How can a line through B be constructed parallel to m?
- A transversal l crosses line m at A, and B is the point through which the parallel must pass.
- Draw an arc at A to mark the angle between m and l; use the same radius to draw an arc at B.
- Transfer the distance between the first arc's intersections onto the arc at B.
- Join B to the transferred point S; the copied corresponding angles are equal.
Do not change the compass radius when drawing the two main arcs. Copy the distance between the arc intersections as a chord; do not estimate the angle by eye.
Arch Designs
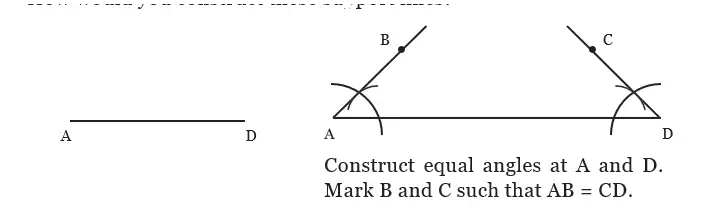

Plan an Arch Using Support Lines
- Draw the straight support segments that will guide the arch.
- For a symmetric trefoil design, make the corresponding support lengths and angles equal.
- For a pointed design, make the two support segments equal and mark their midpoints.
- Use the supports as guides for the arcs; vary the radii to create different arch shapes.
What support conditions help make a trefoil arch symmetric?
- Choose the support segments for a symmetric trefoil arch.
- Set the corresponding support angles equal to preserve symmetry.
- Draw the arch curves using the supports as guides; choose radii to suit the desired outline.
Construct four pairs of parallel lines in different orientations.
Describe how to prepare supports for a pointed arch.
Quick recap
- Use a transversal to relate the given line to the line being constructed.
- Copy a corresponding angle with equal-radius compass arcs to construct a parallel.
- Equal corresponding angles show that two lines are parallel.
- Arch support lines set the shape and symmetry of the curves.
- Trefoil supports use equal corresponding lengths and angles.
- Pointed arches use two equal-length supports; changing arc radii changes the outline.
Regular Hexagons
Regular Hexagons and Equilateral Triangles
Regular polygon — A regular polygon has all sides equal and all interior angles equal.
Regular hexagon — A regular hexagon is a six-sided polygon with equal sides and equal interior angles.
Hexagon and triangle facts
- Regular examples: An equilateral triangle and a square are regular polygons with 3 and 4 sides.
- Decomposition: Joining the centre of a regular hexagon to its six vertices divides it into six congruent equilateral triangles.
- Side and radius: In this construction, each hexagon side equals the radius from the centre to a vertex.
- Interior angle: Two equilateral-triangle angles meet at each hexagon vertex, giving an interior angle of 120°.
- Opposite vertices: Lines joining opposite vertices pass through the centre, so each such line is straight.
A regular hexagon can be split into six equilateral triangles around its centre.
Why does joining the centre of a regular hexagon to its vertices produce six equilateral triangles, and what is each interior angle?
- A regular hexagon is divided by its centre-to-vertex segments into six congruent triangles.
- Each triangle is equilateral, so two of its angles form each hexagon interior angle.
Angles Around a Point
Angles meeting at one point fill the region without gaps or overlap when their measures add to 360°.
Subtract the sum of the known angles from a complete turn.
The angles around a point are 40°, 60°, 50°, 30°, 40° and 90°. Find the gap and decide whether a 70° angle fits.
- Add the known angles around the point.
- Subtract their sum from a complete turn to find the gap.
Do not assume angles fit just because their vertices meet; their total must be exactly 360° to fill the space around a point.
Constructing a 60° Angle
60° angle construction — Constructing an equilateral triangle on a line segment gives a 60° angle at each vertex.
Construct a 60° angle at A on ray AX
- Choose B on ray AX and set the compass width to AB.
- Draw an arc centred at A. With the same width, draw an arc centred at B; call their intersection C.
- Join A to C. Triangle ABC is equilateral, and the angle between AC and AX is 60°.
How can you construct a 60° angle at A on ray AX using a ruler and compass?
- Use the same compass width AB for arcs centred at A and B.
- Join A to the arcs' intersection C to complete the equilateral triangle.
Constructing a Regular Hexagon
Why six equilateral triangles fit
- At the centre: Each equilateral triangle contributes an angle of 60°.
- Full turn: Six such angles total 360°, so the triangles meet without gaps or overlaps.
- Hexagon shape: Their outer edges form a hexagon with equal sides and 120° interior angles.
Construct a regular hexagon of a given side length
- Set the compass to the required side length and draw a circle with that radius.
- Choose a point on the circle and keep the compass width unchanged as you mark six successive points around it.
- Join consecutive points with a ruler to form the hexagon.
How do you construct a regular hexagon with side length 4 cm?
- Draw a circle of radius 4 cm.
- Step the compass width around the circle to mark six vertices.
- Join the consecutive vertices, including the last to the first.
Keep the compass width unchanged when marking the vertices; changing it can produce unequal sides.
Constructing 30° and 15° Angles
Angle bisector — An angle bisector divides an angle into two equal angles.
Bisect a constructed 60° angle to get 30°; bisect the 30° angle to get 15°.
How can you construct a 15° angle using a ruler and compass?
- Construct 60° and bisect it to obtain 30°.
- Bisect the 30° angle to obtain 15°.
Six-Pointed Star
Six-pointed star — A six-pointed star can be formed by overlapping two equilateral triangles.
Star construction and symmetry
- Construction: Mark six equally spaced points on a circle and join alternate points to form two overlapping triangles.
- Triangles: The two large triangles are equilateral; each angle is 60°. The six small triangles forming the star's points are also equilateral.
- Rotational symmetry: The star matches itself after turns of 60°; its rotational symmetry is of order 6.
The smallest rotation carrying the star onto itself is one-sixth of a full turn.
How can you construct a six-pointed star, and what is its smallest rotational symmetry angle?
- Mark six equally spaced points A, B, C, D, E and F on a circle.
- Join alternate points to make two equilateral triangles.
- The triangles form the six-pointed star, which matches after a 60° turn.
Angles around a point are 80°, 75°, 90° and 65°. Find the remaining angle.
Why can six congruent equilateral triangles fit around one point without gaps?
How can you construct a 30° angle using a ruler and compass?
Quick recap
- A regular hexagon has six equal sides and six equal angles.
- Six equilateral triangles fit around one point because 6 × 60° = 360°.
- Angles around a point total 360°; subtract known angles to find a missing angle.
- Equal-radius arcs construct an equilateral triangle and hence a 60° angle.
- For a regular hexagon inscribed in a circle, its side length equals the circle's radius.
- Bisect 60° to get 30°, and bisect 30° to get 15°.
- A six-pointed star is formed from two overlapping equilateral triangles and has sixfold rotational symmetry.
Tiling
Tangrams and Tiling
Tangram — A tangram is a puzzle made from seven pieces obtained by dividing a square; the pieces can be rearranged to form different shapes.
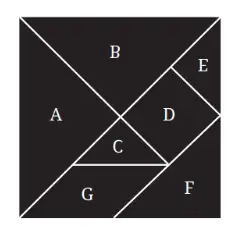
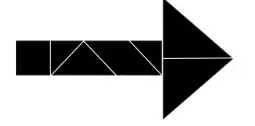
Tiling — Tiling is covering a region with shapes without leaving gaps or overlaps.
Tiling Rectangular Grids with Dominoes
Grid and domino basics
- Grid size An grid has rows and columns, so it contains unit squares.
- Domino A tile covers exactly two unit squares and may be rotated.
- Area test A region must have an even number of unit squares to be domino-tiled; this is necessary, but not always sufficient for irregular regions.
A domino-tileable region must contain an even number of unit squares.
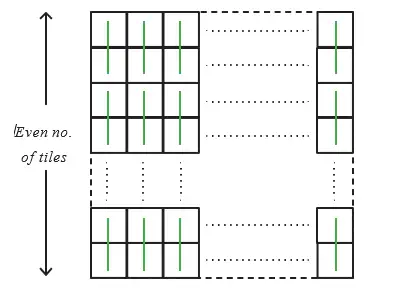
An rectangular grid can be tiled with tiles exactly when at least one of its dimensions is even.
Tile a rectangular grid
- If the number of rows is even, pair squares vertically in every column.
- If the number of columns is even, pair squares horizontally in every row.
- If both dimensions are odd, the grid has an odd number of squares, so it cannot be tiled.
Can a grid be tiled with tiles?
- Find the number of unit squares in the grid.
- Every domino covers two squares, but the grid has an odd total.
- Therefore, the grid cannot be covered completely by dominoes.
Can a grid be tiled with dominoes?
Checkerboard Colouring
Colour test for domino tilings
- Checkerboard colouring Colour neighbouring unit squares alternately black and white; each square then has neighbours of the opposite colour.
- Domino property Every tile covers one black square and one white square.
- Balance condition A tileable region must have equal numbers of black and white squares.
- Limit Unequal colour counts prove a region is not tileable; equal counts alone do not prove that it is tileable.
A region that can be tiled by dominoes must contain the same number of black and white squares.
A region is domino-tileable on the ordinary grid exactly when its checkerboard-coloured version is tileable with black-and-white dominoes aligned to the matching colours. The colouring labels the same squares; it does not change which squares touch.
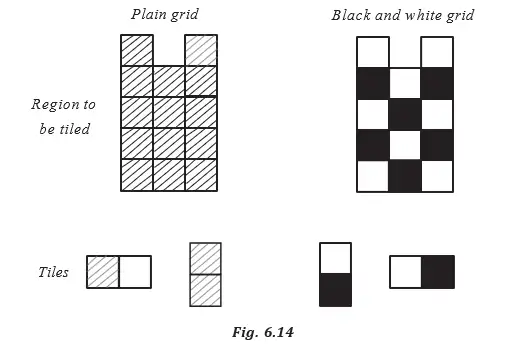
Test a region using checkerboard colours
- Colour neighbouring squares alternately black and white.
- Count the squares of each colour.
- If the counts differ, conclude that no domino tiling is possible.
Show that removing a square of the less frequent colour from a grid makes it impossible to tile with dominoes.
- A grid has squares, with checkerboard counts of eight and seven.
- Remove one square of the colour that occurs seven times.
- The remaining colour counts are unequal, so domino tiling is impossible.
A region has black squares and white squares. Can it be tiled by dominoes?
For an irregular region, check its checkerboard colour counts: an imbalance is a proof of impossibility, but a balance is not proof of tileability.
Quick recap
- Tiling covers a region without gaps or overlaps; tangram pieces can be rearranged into new shapes.
- A domino covers two unit squares, so any tileable region has an even area.
- A rectangular grid is domino-tileable exactly when at least one of its dimensions is even.
- Checkerboard colouring makes every domino cover one black and one white square, so a tileable region needs equal colour counts.
- A plain-grid tiling exists exactly when the checkerboard-coloured version can be tiled with colour-aligned dominoes.
- Unequal checkerboard counts prove non-tileability; equal counts alone do not guarantee a tiling.
Tiling The Entre Plane
Tiling — Covering a plane with one or more shapes without gaps or overlaps.
Summary
Bisection and Perpendicular Bisectors
- Bisection: Dividing a line segment or other geometrical quantity into two identical parts.
- Perpendicular bisector: A line that passes through the midpoint of a segment and is perpendicular to it.
- Equal distances: Any point equidistant from the endpoints of a segment lies on its perpendicular bisector.
- Construction: Equal-radius arcs centred at the segment’s endpoints intersect at points on its perpendicular bisector; joining these points constructs the line.
Formula sheet
Mathematics — ALL CHAPTERS
1
Large Numbers Around Us
2
Arithmetic Expressions
3
A Peek Beyond the Point
4
Expressions using Letter-Numbers
5
Parallel and Intersecting Lines
6
Number Play
7
A Tale of Three Intersecting Lines
8
Working with Fractions
1
Geometric Twins
2
Operations with Integers
3
Finding Common Ground
4
Another Peek Beyond the Point
5
Connecting the Dots
6
Constructions and Tilings
7
Finding the Unknown